 Save
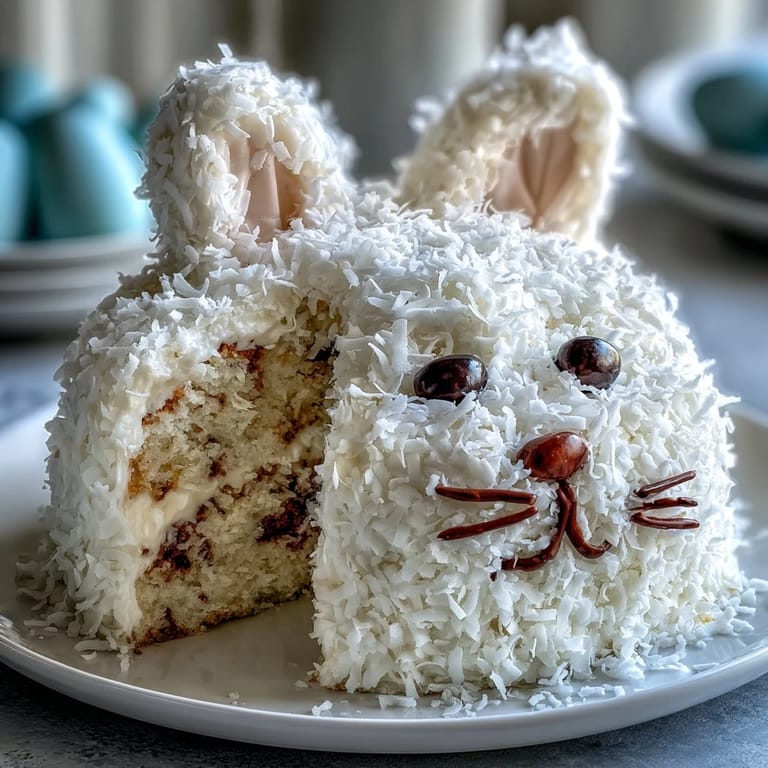
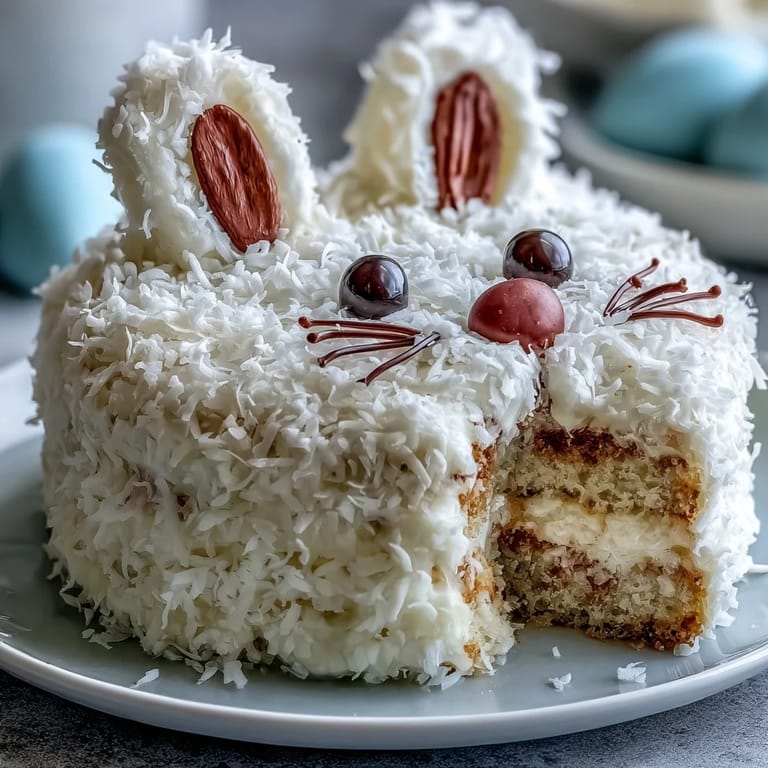
Save My daughter burst into the kitchen last Easter morning with a sketch she'd drawn of a bunny cake, and I knew right then I couldn't disappoint her. There's something about watching a child's eyes light up when a whimsical dessert actually becomes real on the table. This Easter Bunny Cake with its soft vanilla layers and fluffy coconut frosting became the centerpiece of our celebration, and honestly, it was easier than I expected. The best part? Everyone from my toddler to my mother-in-law reached for a slice, and nobody cared about perfection—they just cared that it looked like a smiling bunny.
I'll never forget my neighbor's face when she walked in and saw that bunny sitting proudly on our dining table, surrounded by pastel jelly beans and little marshmallow puffs. She immediately asked for the recipe, and within two weeks, she'd made her own version for her nephew's birthday. That's when I realized this cake had a magic beyond just tasting good—it genuinely brings people together and gives them permission to be playful in the kitchen.
Ingredients
- All-purpose flour: The base of your cake, and sifting it really does make a difference in the crumb—don't skip that step even though it feels fussy.
- Baking powder: This gives you that light, tender crumb that makes every bite feel like it melts on your tongue.
- Salt: Just a pinch to balance the sweetness and brighten the vanilla flavor without anyone realizing it's there.
- Unsalted butter: Room temperature is non-negotiable here; cold butter won't cream properly with the sugar, and you'll notice it in the texture.
- Granulated sugar: This creams with the butter to incorporate tiny air bubbles that make the cake rise beautifully and stay tender.
- Eggs: Add them one at a time so they fully incorporate; rushing this step can make your batter break and separate.
- Vanilla extract: Pure vanilla makes a world of difference compared to imitation, especially in a simple cake like this where it's one of the main flavoring agents.
- Whole milk: The alternating method of adding flour and milk creates an incredibly smooth batter and keeps the cake moist.
- Powdered sugar: Sift it before using to avoid lumps that can make your frosting grainy and unpleasant to eat.
- Sweetened shredded coconut: Toast it lightly in a dry skillet for five minutes if you want deeper, more complex coconut flavor, but raw is perfectly lovely too.
- Food coloring and decorations: Gel food coloring works better than liquid because it doesn't thin out your frosting, and quality candies make the bunny's face genuinely charming.
Tired of Takeout? 🥡
Get 10 meals you can make faster than delivery arrives. Seriously.
One email. No spam. Unsubscribe anytime.
Instructions
- Get your pans ready:
- Preheat your oven to 350°F while you grease and flour two 9-inch round cake pans—this takes just five minutes but saves you from sticking disasters. The flour coating prevents the edges from browning too quickly while the center bakes.
- Combine your dry ingredients:
- Whisk together the flour, baking powder, and salt in one bowl, then set it aside; this distributes the leavening evenly so you don't get any bitter pockets where baking powder settled.
- Cream the butter and sugar:
- Beat softened butter and sugar together for about three minutes until it's light, fluffy, and pale yellow—this aeration is what gives the cake its tender crumb. You'll hear the mixer change pitch as air incorporates, and that's your cue it's ready.
- Add eggs with intention:
- Add eggs one at a time, beating well after each addition so each one fully blends in before you add the next. This prevents the batter from looking curdled or separated, which would compromise the final texture.
- Mix in vanilla:
- A tablespoon of pure vanilla extract goes in after the eggs, and you'll immediately smell that warm, comforting aroma that makes baking feel special.
- Alternate flour and milk:
- Add the flour mixture and milk in alternating batches, starting and ending with flour; this prevents overmixing, which would develop gluten and make your cake tough. Mix just until you don't see streaks of flour anymore.
- Divide and bake:
- Divide the batter evenly between your pans and smooth the tops with a spatula, then slide them into the oven for 30-35 minutes. The cake is done when a toothpick inserted in the center comes out clean or with just a crumb or two clinging to it.
- Cool with patience:
- Let the cakes sit in their pans for 10 minutes before turning them out onto wire racks to cool completely; this prevents them from splitting but also prevents them from being too fragile to handle.
- Make the frosting:
- While cakes cool, beat softened butter until it's creamy, then gradually add powdered sugar, milk, and vanilla, beating until light and fluffy. This whole process takes about five minutes and creates a frosting that's spreadable but sturdy enough to support coconut.
- Reserve and tint pink frosting:
- Set aside half a cup of white frosting and color it with gel food coloring for the bunny's inner ears and nose details. This way you have contrast and that classic Easter bunny look.
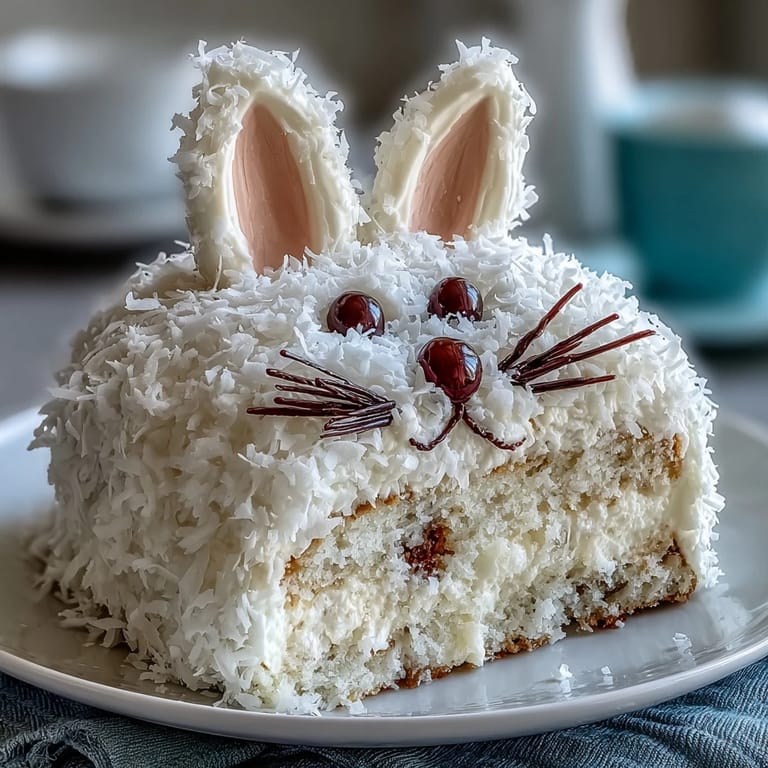
- Shape the bunny:
- Cut one round cake to form ears and a bow tie, then arrange both round cakes and the cut pieces on a large board or platter to create the bunny's face. Take your time with this step because positioning makes all the difference in how whimsical it looks.
- Apply crumb coat:
- Spread a thin layer of white frosting over the entire cake structure to trap any crumbs, then chill it for 15 minutes. This step prevents dark crumbs from showing through your final frosting, making everything look polished.
- Frost generously:
- Cover the cake with a generous layer of remaining white frosting, using an offset spatula to get peaks and valleys that feel organic. The texture should feel abundant and inviting.
- Press in the coconut:
- While the frosting is still soft, press shredded coconut all over the frosted surfaces to create that fluffy, bunny-like effect. The coconut sticks beautifully and transforms the cake into something magical.
- Add pink details:
- Use your pink-tinted frosting to fill in the inner ears and nose, creating definition and personality. A small offset spatula or the back of a spoon works perfectly for this.
- Decorate the face:
- Arrange jelly beans or candies for eyes, use chocolate chips or black edible gel for the nose, place licorice strings for whiskers, and position mini marshmallows for cheeks and tail. This is the fun part where the bunny comes to life and everyone in the room smiles.
 Save
Save What started as a simple cake became a tradition in our house, and now every Easter, my daughter insists on making the bunny together. She's gotten skilled at decorating the face, and I handle the frosting and coconut, and those afternoons in the kitchen with her are honestly worth more than any fancy restaurant meal.
Timing and Prep Wisdom
You can bake these cake layers the day before and store them tightly wrapped in plastic wrap or in an airtight container, which takes pressure off on the day of your celebration. The frosting also holds beautifully for a few hours, so you can frost the cake a few hours ahead and keep it in a cool place until serving. I've learned that assembling and decorating this cake actually benefits from a bit of time management—bake when you have space in your schedule, frost the next day or a few hours before, and decorate just before guests arrive so the candies look fresh and the coconut hasn't absorbed moisture from the frosting.
Variations to Make It Your Own
If coconut isn't your thing or someone at your table has an aversion, you can substitute toasted coconut flakes for a deeper, nuttier flavor, or skip the coconut entirely and cover the frosting with sprinkles, edible pearl dust, or nothing at all—the cake stands on its own. Some bakers love swapping the coconut frosting for cream cheese frosting, which creates a tangier, richer taste that feels more sophisticated than sweet, and it pairs beautifully with the vanilla cake. You could also color the entire frosting in pastel shades to match your spring décor, or use different candies to make the bunny match your celebration's color scheme.
Storage and Serving Suggestions
Once assembled and decorated, the cake keeps beautifully in a cool room for up to four hours, or you can refrigerate it and pull it out 30 minutes before serving so the frosting softens slightly and the cake tastes less cold. Leftover slices store in an airtight container in the fridge for three days, though honestly, there rarely are leftovers. This cake pairs wonderfully with a light Moscato, fresh lemonade, or even a cup of hot tea if you're serving it as an afternoon treat.
- Cut the cake with a warm, slightly damp knife to prevent the frosting from tearing or dragging.
- If you're making this ahead, keep it in a cool room or the fridge and slice just before serving for the best texture.
- Take a photo before anyone digs in—this bunny is too charming not to capture for memories.
 Save
Save This Easter Bunny Cake isn't just a dessert—it's permission to have fun in the kitchen and create something that makes people smile the moment they see it. Every time someone bakes this for their family, they're not just following a recipe; they're creating a moment, and that's what cooking is really about.
Recipe FAQ
- → How to shape the bunny from the cake layers?
Use one round cake for the face, cut another into shapes for ears and a bow tie using a serrated knife. Arrange pieces on a platter before frosting.
- → Can I prepare the cake layers in advance?
Yes, baking the layers a day ahead and storing them tightly wrapped helps with assembly and flavor development.
- → Are there alternatives to the coconut frosting?
You may substitute with toasted coconut for a nutty twist or use cream cheese frosting for added tanginess.
- → What is the best way to apply shredded coconut?
After spreading the frosting evenly, gently press shredded coconut over the surface to create a soft, fluffy texture.
- → How should I store leftovers?
Keep the assembled cake refrigerated, covered well to maintain freshness and prevent drying out.
- → What decorations make the bunny features stand out?
Use pink-tinted frosting for inner ears and nose, jelly beans or candy for eyes, licorice strings for whiskers, and mini marshmallows for cheeks and tail.